Wednesday, 24 February 2016

MORE THAN WORDS MINI CHALLENGE

Hi there,  I have made a tag to enter in More Than Words Mini Challenge - what alot of fun :)

I had a great deal of fun playing with black gesso and Finnabair products


Click here to pop over to the More Than Words Challenge Blog.

Here are some close ups:


I started with a black tag and used a Tim Holtx Mini Stencil with 3d Gloss Gel. I then added embellishments and covered the entire card with black gesso.

Once dried I have used Finnabair Mica Powders, Finnabair Glitter, Micro Beads and Beads.

Til next time  - Happy Crafting :)


Monday, 22 February 2016

More than Words - February Challenge

Hello :)  Who can resist a challenge as awesome as this months at More Than Words Challenge - Wonderful and Sparkle.

I was inspired by a wonderful photo of a wonderful little girl in wonderful colours!  and then using different mediums I made it sparkle!


Here is the moodboard - you click here to head over to the More Than Words Challenge Blogspot.


Some close up:


I have used the awesome Colour Blast Pastes Snow White,Sunshine and Royalty through The Crafters Workshop Stencils.


Prima Flowers, Gems, Glitter and Sequins.


A Stamp It Stamp (Siset051) with Lindy Stamp Gang Embossing Powder - Terra Cotta Rust


The chipboard has been embossed with Colour Blast Embossing Powder - Sunshine

Thanks for stopping by and until next time Happy Crafting


KRAFT + CHALLENGE ENTRY FOR FEBRUARY

Hello everyone, this month I found the time (not sure how lol!) to enter the Kraft + Challenge entry. This months challenge is going postal.  As I do not get alot of snail mail these days, I went back to my stamp collection from when I was a wee girl and found these dog stamps which suited perfectly with my photo of my son entering Molly, our St Bernard in a dog show a few (lot!) years back;


and here is the mood board.  You can find out all about there challenges here on their blog

Here is a few close ups:


Products used:

Prima Stencil with 3D Gloss Gell and Green Opal Magic Mica Powder
2 Crafty Chipboard with Lindy Stamp Gang Embossing Powder Tannerbaun Green Gold
Urban Stamps with Lindy Stamp Gang Embossing Powder Tannerbaun Green Gold
EK Success Punch
Tim Holtz Die Cut
Paints - Lindy Stamp Gang Magicals - Bells of Ireland Green and Freaky Franken Lime and Inklings - Freshly Minted

Thanks for stopping by and til next time Happy Crafting :)


Thursday, 18 February 2016

Colour Blast DT Layout

Hi there - Lynn back again, this time with a 12x12 layout that I created for Colour Blast.  I live in Tasmania and although it snows here alot, we have only had snow at our house twice in 10 years  (normally in winter, it is just cold and wet and the snow doesnt settle!).  I have created a layout using two photos of our backyard covered in snow


I started by creating the background - I have used 13 Arts paper - Warm Winter Night and plain blue cardstock with a strip of corrugated board.  I have used gesso on the corrugated board and while wet, sprinkled Colour Embossing Powder - Snow White  - and dried with a heat gun.


I have used a Butterfly Collage Stencil and Colour paste - Singin the blues for the big circle.


Once dry I have randomly stamped with Inkadinkado Woodland Stamps in a clear embossing stamp and used the Embossing Powder - Snow White.  Final bit of stamping Stamp It stamps in black ink and the background is complete.


I have embossed the chipboard using Colour Embossing Powder in the same colours - Snow White and Singin the Blues.


Dont forget to pop over to their blog here and check out all the other awesome projects/layouts.


Thanks for stopping by and until next time - Happy Crafting :)

Tuesday, 16 February 2016

Photo Tutorial for Off the Rails

Hi there.  I am back with Off The Rails Scrapbooking. They have two mood boards this month which has been great.  This is my second layout and I chose to go with the Summer Days layout.  I actually had a photo of my son's girlfriend wearing a big hat, so I have been inspired by the colours and the picture.  I have created a photo tutorial of creating the background.


Here is the mood board that I went with this month:

and this is the second moodboard


Start by cutting 2cm off each side of 12x12 patterned paper and lay on top of the plain 12x12 cardstock.  I have used patterned  paper by Maja Design - Fika.


Lay out the photo and chipboard and mark with a pencil the area of the photo (No point in wasting products that wont be seen!)


Using a brick stencil and 3D Gloss gel, add some bricks around the area of the photo and at the centre of the bottom of the page.


While you are waiting for the bricks to dry, cover the chipboard with gesso and emboss with embossing powder. I have used whichcraft do you do chipboard and Stampendous Embossing Powder - Golden Sands and Shabby Green.


Now the bricks are dry, I have sprayed around the bricks with Lindy Stamp Gang, "Gossamer Gold" and dried with the heat gun, pushing the spray in the direction I wanted.  I then applied Tattered Angels Chalkboard Paint " Iron".  I used the nozzle of the sprayer and painted around the edges of the bricks and then blended with my finger.


Now you can building the page with embellishments. I have placed ripped pieces of washi take around where the photo is going to go and randomly stamped a script stamp around the bricked areas.  Once you have placed the embellishments to your liking, glue them down and add glass and micro beads for that final bit of bling.

I hope that you have enjoyed this short tutorial and have a go yourself at this months challenge.  You can find all the information on their blog here.here

Til next time - happy crafting :)

Monday, 15 February 2016

Farewell Gift

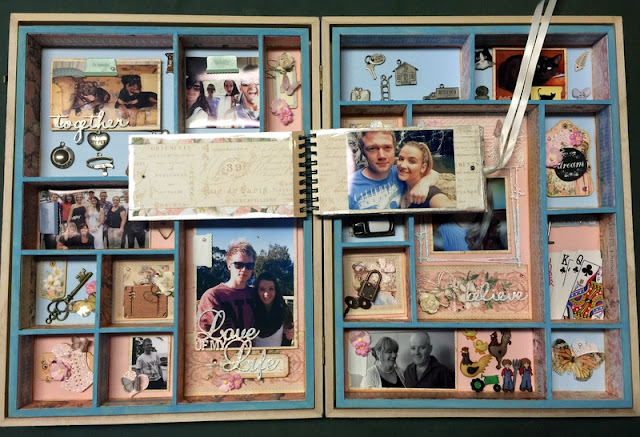
Today my son and his girlfriend left Tasmania to begin the new adventure over on the mainland in Melbourne.  It was a very sad time for me but exciting times for them.  I made Jaclyn a little suitcase which contained many memories of Tasmania.   (excuse the photos, I was running out of time and had to take them quickly before they arrived for dinner!)

This is the front of the suitcase


I couldn't fit all the photos in so I also made a mini album.


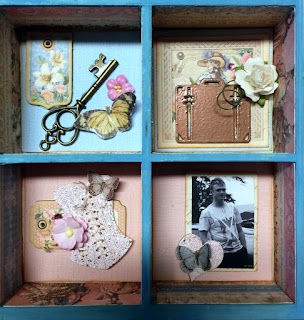
Some of the small boxes:


Jaclyn and I would play cards alot - 5 Crowns.


I spent the past 6 months giving her driving lessons before she left.


Representing the reason she is travelling to the mainland


The key is to the new beginnings.  The suitcase the travel, the corset is her growing up and the photo is my son.


and finally this is us and the animals represent our little hobby farm.


February Mid Month Reveal - Off The Rails Scrapbooking

Welcome to my DT reveal for Off The Rail Scrapbooking.  This month features two moodboards and I have chosen my first layout to be "romance"moodboard.  I will be doing a tutorial on the "summer days"moodboard tomorrow, so stay tuned for that one :)

Nothing says romance better than a wedding photo, and I have chosen one from my wedding a number of years ago!


Here are the two moodboards

Romance:

Summer Days:


I have used black cardstock and created some layers around my photo with dictionary paper.  I have then applied 3d gloss gel from Art Basics with a Prima Stencil around the area.


I have sprayed Colour Blast Shimmer Spray - Rose Petal and Snow White around the stenciled area.  I have then stamped randomly with  Colour Blast Rose Petal embossing powder and a kaisercraft script stamp.  I have not sealed this with a heat gun, I gave it a bit to dry and then I have dry brushed off the embossing powder and this has left the mica powder in place where the stamp is.


I have embosssed with the kaisercraft flutter stamp and Stampendous Shabby Pink Embossing Powder around the layout.
The Memory Maze chipboard has been coloured with Colour Blast Embossing Powder - Rose Petal.

I have used distress paint - Picked Raspberry and Lindy Stamp Gang Magicals - Raspberry Lemonade around the layout also.

Finishing touches with sequins, beads, micro beads and flowers from Prima and Iamroses.
Some more close ups:


Dont forget to head over to Off The Rails Scrapbooking here and have a look at the other Design Teams wonderful layouts.  Have a go - Memory Maze and Candy Chelepy are the sponsors this month.

Til next time - Happy Crafting :)

Valentines Day Reveal for Off The Rails Scrapbooking

I am sorry this is a little late, but as they say better late than never!

Off the Rails Scrapbooking are having a special DT Reveal for Valentines Day.  You can check out all the awesome layouts/projects here

I have created a wedding page of my gorgeous niece:


and here are some close ups of the clusters :


Thanks for stopping by and I will be back later today with another design team project. Til then Happy Crafting!